In order to access the PDF417 functionality the module
"pdf417/jpgraph_pdf417.php" must first be included.
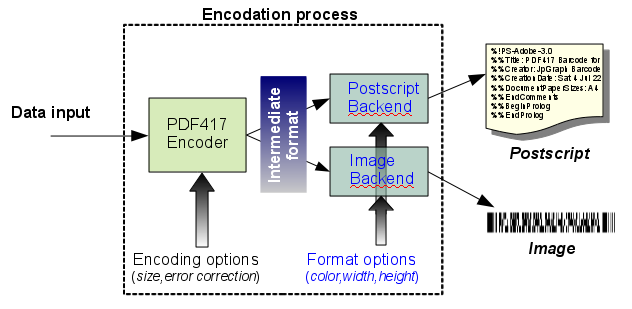
Usage of PDF417 barcodes follows a similar schema as for the linear barcodes with the concepts of an encoder and backend. The principle of the overall encodation process is shown in Figure 25.4. Overview of the interaction between encoder and backends
In order to create a PDf417 barcode the following principle steps are needed
-
Create an instance of the PDF417 encoder (as an instance of
class
                            PDF417Barcode
) -
Create an instance of a backend to produce the wanted output (image, postscript or encapsulated postscript) by using the static factory method
PDF417BackendFactory::Create() -
Encode data and send it back to the browser or a file with a call to the backend
Stroke()method.
The following script shows how to create the simplest possible barcode (in PNG format) representing the data string "PDF-417" encoded using default number of columns and the default error correction level
Example 25.1. The most basic PDF417 script (pdf417_ex0.php)
1 2 3 4 5 6 7 8 | // content="text/plain; charset=utf-8" require_once ('jpgraph/pdf417/jpgraph_pdf417.php'); $data = 'PDF-417'; // Create a new encoder and backend to generate PNG images $backend = PDF417BackendFactory::Create(BACKEND_IMAGE,new PDF417Barcode()); $backend->Stroke($data); |

As can bee seen from the code above the basic interface to the library makes use of one abstract factory to create the appropriate output backend. This design makes the addition of new output formats transparent for the end user of the library.
The example above does not have any error handling. If there is some error in the process an exception will be thrown in the same way as in other places in the library. The default exception will display the standard library image error box. If we instead always wanted to do some additional processing and perhaps just display a text based re-formatted error message we could change the above code to catch this exception as the following example shows
Example 25.2. Adding error handling (pdf417_ex1.php)
1 2 3 4 5 6 7 8 9 10 11 12 13 | // content="text/plain; charset=utf-8" require_once ('jpgraph/pdf417/jpgraph_pdf417.php'); $data = 'PDF-417'; try { // Create a new encoder and backend to generate PNG images $backend = PDF417BackendFactory::Create(BACKEND_IMAGE,new PDF417Barcode()); $backend->Stroke($data); } catch(JpGraphException $e) { echo 'PDF417 Error: '.$e->GetMessage(); } |

when an exception is thrown it will be caught and the error string echoed. If instead we wanted to specifically encode the data using 8-columns and using error detection level 5 the code would have to be modified to
Example 25.3. Adjusting the number of columns and error correction level (pdf417_ex1b.php)
1 2 3 4 5 6 7 8 9 10 11 12 13 14 15 16 17 18 19 20 | // content="text/plain; charset=utf-8" require_once ('jpgraph/pdf417/jpgraph_pdf417.php'); $data = 'PDF-417'; // Setup some symbolic names for barcode specification $columns = 8; // Use 8 data (payload) columns $errlevel = 2; // Use error level 2 (minimum recommended) // Create a new encoder and backend to generate PNG images try { $encoder = new PDF417Barcode($columns,$errlevel); $backend = PDF417BackendFactory::Create(BACKEND_IMAGE,$encoder); $backend->Stroke($data); } catch(JpGraphException $e) { echo 'PDF417 Error: '.$e->GetMessage(); } |

Later on we will go through all the different options available both on the encoder and on the backends. But for now let's just show how easy it is to change the size of the barcode and add a human readable text at the bottom of the bar from the example above.
In the same way as for linear barcode the concept of "module width" is used. This is basically the width of a unit bar in the barcode. Remember that each codeword is made up of 17 modules where there are 4 black and 4 white areas of various width. The width of the module is specified with the backend method
-
Backend::SetModuleWidth($aWidth)
For images this is specified in pixels and for a postscript backend this is interpretated as specifying the number of points (1 pt = 1/72 inch).
To add a human readable version of the data at the bottom of the barcode we use the method
-
Backend::ShowText($aShow=true)
Adding these tow method calls to our previous example will give us the following code and resulting barcode.
Example 25.4. Adjusting the module width and showing human readable text (pdf417_ex2.php)
1 2 3 4 5 6 7 8 9 10 11 12 13 14 15 16 17 18 19 20 21 22 23 24 | // content="text/plain; charset=utf-8" require_once ('jpgraph/pdf417/jpgraph_pdf417.php'); $data = 'PDF-417'; // Setup some symbolic names for barcode specification $columns = 8; // Use 8 data (payload) columns $errlevel = 2; // Use error level 2 (minimum recommended) $modwidth = 2; // Setup module width (in pixels) $height = 3; // Height factor // Create a new encoder and backend to generate PNG images try { $encoder = new PDF417Barcode($columns,$errlevel); $backend = PDF417BackendFactory::Create(BACKEND_IMAGE,$encoder); $backend->SetModuleWidth($modwidth); $backend->SetHeight($height); $backend->Stroke($data); } catch(JpGraphException $e) { echo 'PDF417 Error: '.$e->GetMessage(); } |

In the remainder of this chapter we will explain in more detail what other formatting options are available.